Imagine your high-paid possession cruising down the road, its paint gleaming under the sun, free from the scars of daily wear and tear. This dream can become a reality with PPF installation, a revolutionary solution that has captured the hearts of car enthusiasts and everyday drivers alike.
This maintenance requires your keen interest, and it also demands a thorough understanding of the PPF installation process. We are here to present a comprehensive guide that will unravel each step, highlighting why meticulous attention to detail is vital.
In this blog, we will unravel each step, from how to install PPF to searching for the PPF installer near me, highlighting the vital meticulous attention to detail and how skipping any step can diminish the film’s protective powers. So let’s get ready to take a ride on this blog.

Why PPF Installation is Essential?
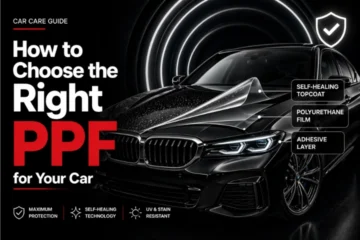
PPF installation is more than just a cosmetic enhancement. It protects your car’s paint from scratches, chips, and UV damage, ensuring your vehicle looks new for longer. Proper PPF installation is crucial to achieving these benefits. A poorly installed PPF can lead to bubbles, peeling, and ineffective protection, defeating the purpose of the investment.
Steps for PPF Installation?
The steps to installing PPF are multiple. Some believe there are four, and some think there are 6, but here we are representing every step you will see or follow if you install PPF. The steps are as follows.
Step 1: Preparation: Clean the Vehicle
The first step is always crucial in any process, as the complete process depends on it. PPF installation involves a thorough cleaning. This step removes any dirt and grime from the surface that could interfere with the film’s adhesion, so your car paint will remain protected and attractive for a longer period. This process also contains three points to be focused upon.
- Wash the car by using a good quality car shampoo to maintian the PH of the car’s paint.
- Decontaminate the paint with a clay bar to remove any embedded contaminants.
- Dry the surface thoroughly using microfiber towels.
Step 2: Surface Inspection: Check for Paint Imperfections
Take your time and do a thorough search for this. Where has your car paint been damaged, and what parts need more attention? Inspect the car’s paintwork for imperfections, such as scratches or swirl marks. Address these before applying PPF to ensure a smooth finish.
- Paint correction may be necessary to fix any minor imperfections.
- Polish the surface if needed to achieve a flawless base for the film.
Step 3: Cutting the Film: Precision is Key
This step requires your focus on perfection, and cutting the PPF to fit your vehicle precisely is crucial. Many professionals use pre-cut PPF kits specific to car models, but custom cutting may be required for a perfect fit. Good experience in this field can help you do this task as well and as quickly as possible.
- Measure the panels and cut the film accordingly.
- Use a sharp blade to ensure clean, precise edges.
Step 4: Positioning the Film: Align and Position
If you are doing the entire installation process, search for the PPF installer near you who can do the task smoothly. Then, carefully align the PPF with the vehicle’s body panels. This step is critical to avoid any misalignment that could lead to exposed edges and reduced protection.
- Use a slip solution (water mixed with a small amount of soap) to help position the film without it sticking immediately. This way, you can set the PPF on the surface while taking your time.
- Align the edges carefully before proceeding to the next step. No need to hurry to do this step.
Step 5: Tack Solution Application: Securing the Film
Once the film is correctly positioned, apply a tack solution (water and alcohol mix) to start securing it in place. This step will decide how your PPF will look after the application. So you just have to be very careful.
- Lift the edges and spray the tack solution underneath.
- Use a squeegee to remove excess slip solution and help the film adhere to the paint.
Step 6: Squeegeeing: Removing Air Bubbles
Squeegeeing is a crucial step in eliminating air bubbles and ensuring a smooth finish. This process should be done methodically to avoid any imperfections. Make sure your paint protection film installers are doing these tasks. This task will determine how effectively your PPF will work after the installation; bubble formation will cause your PPF to yellow. So, make sure this task is done with more care.
- Start from the centre and work your way out to the edges.
- Use firm pressure to push out any air and excess solution.
Step 7: Trimming Excess Film: Clean Edges
This completes the process of PPF installation. These steps give you the final results, and after this, you will get to know how your beloved vehicle will look exactly. Trimming the excess film ensures a neat and professional finish. This step should be done with precision to avoid cutting into the car’s paint.
- Use a sharp blade to cut all the extra edges for a better finish look.
- Follow the contours of the car’s panels closely.
Step 8: Final Inspection and Finishing: Ensuring Perfection
Once all the steps are followed precisely, then it’s time to give a broad overview. This is the last step in which you will get the final vehicle after the PPF is done. Now, how it looks is in front of you. After the film is applied, a final inspection is necessary to check for any bubbles or edges that need more attention.
- Use a heat gun for the film to conform to complex curves and ensure strong adhesion.
- Look for the corners and edges thoroughly to ensure they are securely adhered to.
Importance of Professional Installation
While DIY PPF installation is possible, it requires skill and precision. Professional PPF installers have the experience and tools to ensure a flawless finish. If you’re looking for “PPF installation near me” or considering the “PPF installation cost, ” it’s worth investing in professional services to avoid common pitfalls like bubbles, misalignment, and peeling.
Make sure you search for the best PPF installer near me. Who will give you the best service for your high-paid possessions? This installation will rev up your vehicle’s look also under the best paint protection film installation cost.
Cost Considerations
The cost of PPF installation can vary based on several factors:
1. Vehicle size and model
The bigger the size, the more surface area there will be to cover. In this way, more PPF will be required for this process. Eventually, the cost of paint protection film installation will be higher.
2. Quality of the PPF
As the market for this segment grows, more options will be available, but the best results you can see are only in the best quality PPF. That is the only reason professionals always suggest never falling for the high discount offer. This will cost you less at the time of shop but eventually will not satisfy you with the results.
3. Labor costs
Labor costs are also a consideration when we talk about cost. The installers do the things in the best way possible, and experienced installers will cost you more. Doing DIY and getting help from professionals will always cost you more.
Depending on these variables, the “paint protection film installation cost” varies according to many things, including the material, quality, brand, and demand. It’s essential to get quotes from reputable “paint protection film installers” to understand the “PPF installation price better” and ensure you’re getting value for your investment. Also, it is a good return on your investment.
Conclusion
PPF installation is a meticulous process that, when done correctly, offers unparalleled protection for your car’s paint. Whether you choose to do it yourself or hire a professional, understanding each step and its importance is crucial. Proper installation not only enhances your vehicle’s appearance but also extends its lifespan, preserving its value over time. So, if you’re considering “how to install paint protection film” or looking for a “PPF installer near me,” remember that attention to detail and professional expertise can make all the difference.
FAQ’s – How to Apply Paint Protection Film (PPF)
Q1. How much does it cost to PPF?
The cost to PPF a car varies widely, typically ranging from 50,000 Rs. to 1,00,000 Rs., depending on the vehicle size, film quality, and installation complexity.
Q2. Can you install PPF at home?
Yes, you can definitely do this at home, but to achieve a professional result, requires precision, proper tools, and experience.
Q3. Is PPF really worth it?
Yes, PPF is worth it for protecting your car’s paint from scratches, chips, and UV damage, preserving its appearance and resale value.
Q4. How is PPF applied on cars?
PPF is applied by cleaning the car’s surface, cutting the film to fit, positioning it with a solution, and smoothing out any bubbles or wrinkles.


0 Comments